MIStudio and TransSECS Reporting: Introduction to Jasper Reports
Jasper Reports from MIStudio
In MIStudio Reporting you can use the Dynamic Jasper Report Writer bean to generate a PDF or XLS (Excel) report from a database table or other Two Dimensional Value Object data source all from within MIStudio and MIX. See Dynamic Jasper Report Writer.
Run Reports Designed from Jaspersoft® Studio
You can use Jaspersoft Studio to design reports and compile them so they can be run from MIStudio/MIX and TransSECS with some scripting. You will need to install Jaspersoft Studio (Community Edition is recommended) to follow the tutorials below. This can be downloaded from: https://community.jaspersoft.com/project/jaspersoft-studio/releases, or from the sourceforge site: https://sourceforge.net/projects/jasperstudio/files/
The examples below use SQLite as a the database for simplicity. The database used for these examples is available to download from here: https://www.ergotech.com/files/examples/jasperreports/SimpleSQLiteTest.sqlite
You will need the SQLite driver jar included in the SQLite distribution to run the examples.
Simple Report Design and Test Example
This tutorial will show you how to design and test a simple table report in Jaspersoft Studio which uses a SQLite database for the table data.
Jaspersoft Studio Startup
Start by installing Jaspersoft Studio if not already on your system. Run Jaspersoft Studio. On first starting, you will see a blue welcome page which you can close, or you can use the icon button “Get Started” to open the workspace. If you have installed and used Jaspersoft Studio already, you will see the last project you were working on. Jaspersoft Studio uses “Workspaces” for your projects. The default Workspace location for Windows is in your C:\Users\UserName\JaspersoftWorkspace directory. For Linux it will be in your home/JaspersoftWorkspace directory.
Data Adapters
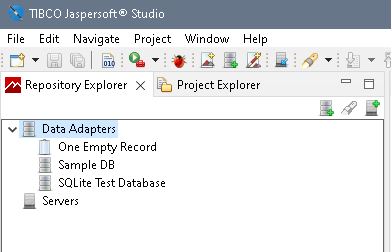
The workspace contains projects and data adapters. Data Adapters are the connections to databases (and sometimes other data sources) for the report. When you first start up Jaspersoft Studio you will see two items under Data Adapters: “Sample DB” and “One Empty Record”. For the report examples we will be adding another Data Adapter for the SQLite database. To prepare for this copy the SimpleSQLiteTest.sqlite file and the SQLite driver jar to a convenient location on your system (with an easy directory path to remember and use, no spaces in the path elements). For these reports examples, these files are copied to C:/Projects/JasperReports (for the examples we are using a Windows system, but for a Linux system these paths are similar, such as using a project subdirectory in your home folder).
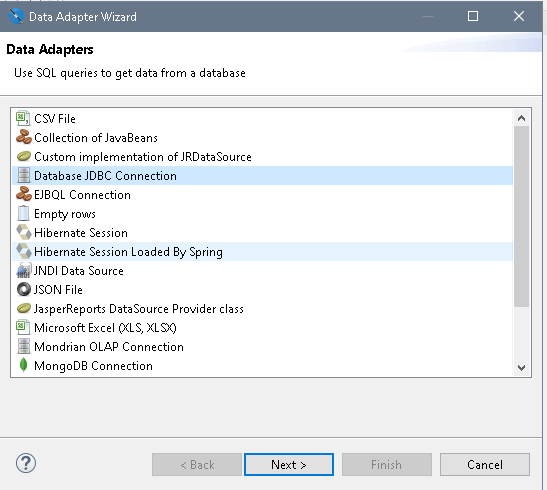
To add the SQLite database as a Data Adapter, right click on Data Adapters and select “Create Data Adapter”. You will see a popup with various Data Adapter choices. Select Database JDBC Connection.
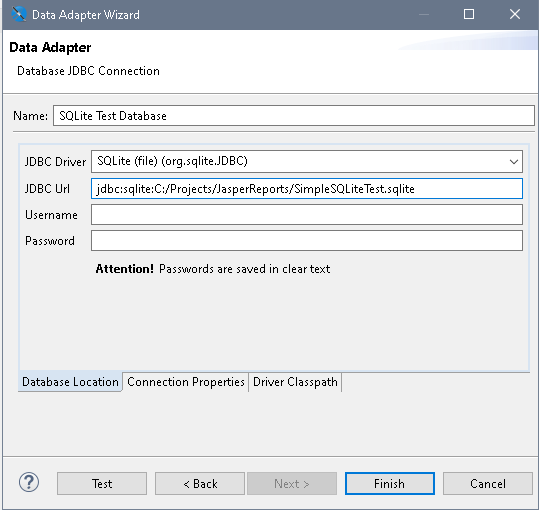
After selecting this adapter type, press Next and you will see the property panel for the Adapter. Change the name “New Data Adapter” to “SQLite Test Database”. For the JDBC Driver, select “SQLite (file) (org.sqlite.JDBC)” from the list. Change the URL from “jdbc:sqlite:[PATH_TO_DB_FILES]/database” to “jdbc:sqlite:C:/Projects/JasperReports/SimpleSQLiteTest.sqlite” (change the path to the SimpleSQLiteTest.sqlite file to where you saved it on your system drive). Leave the User Name and Password empty (there is no user name or password on this database).
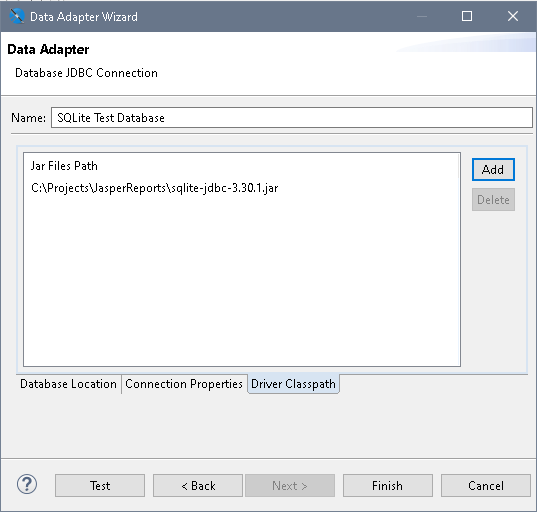
The last step to set this up is to tell the Data Adapter where the SQLite driver jar is located. Click on the Driver Classpath tab at the bottom of the panel and you will see a button to “Add”. Press on the Add button to browse to the location of the SQLite driver jar.
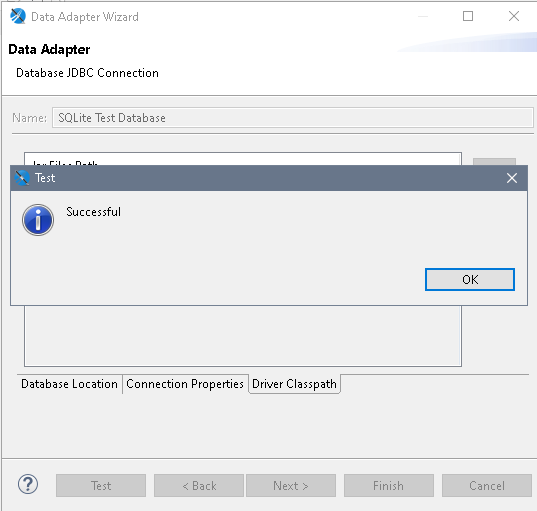
Now this Data Adapter is set up and you can test the connection. Press the Test button at the bottom of the configuration panel and you will see a panel pop up which has the connection test results (it should “Successful”, if not check that your connection parameters are entered correctly).
Press the Close and Finish Buttons on configuration panel to save this configuration. This Data Adapter will now be in listed in the JasperReports “Repository”. The items in the Repository will be available for all projects.
New JasperReport Project
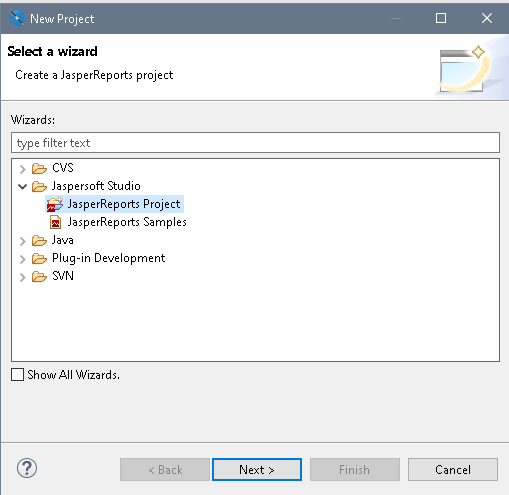
Click on the Project Explorer tab to see the projects in the workspace. There is one project by default called “MyReports”. Right click in the panel and select “New”, and then select “Project…”. A “New Project” panel will be shown. Expand the node called “Jaspersoft Studio”, and then select “JasperReports Project” and press the Next button.
In the next panel for the project, enter a name “SimpleReport” and press Finish.
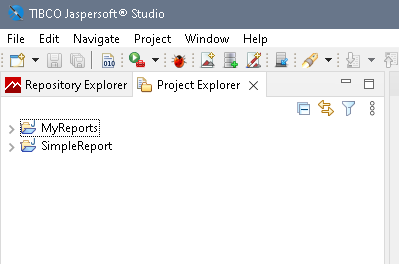
The project explorer will now have the two projects, MyReports and SimpleReport.
Exporting the "SQLite Test Database" Data Adapter
Jaspersoft Studio uses the Data Adapters in the Repository internally while designing and testing reports. To use a DataAdapter configuration later while running the report outside of Jaspersoft Studio you need to “export” this definition. In the step where we connect a data source to the table in the SimpleReport, we will use this exported DataAdapter.
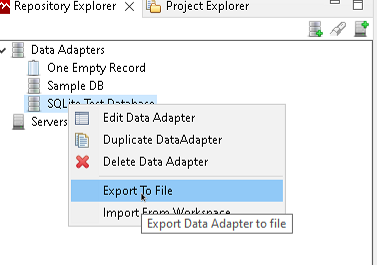
Go to the Repository view of Japersoft Studio, and right click on the “SQLite Test Database” DataAdapter and select “Export to File”.
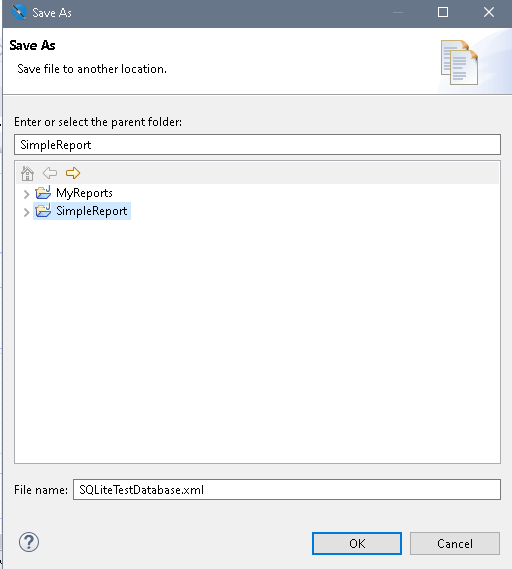
In the next “Save As” panel make sure that the SimpleReport folder is selected as the parent folder, and then save the “SQLiteTestDatabase.xml” file by pressing the OK button.
Now you will see this file in the project “SimpleReport” when you expand the project node in the Project Explorer.
Define the Main report DataAdapter
This next step is a special configuration needed to use the report defined and compiled from Jaspersoft Studio in MIStudio and MIX runtimes.
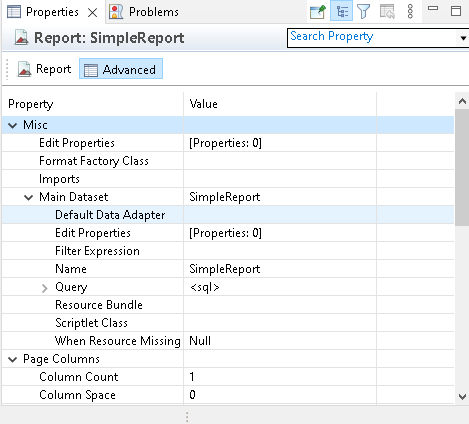
Click on the main report node “SimpleReport” in the Outline of the report design. On the far right lower side of Jaspersoft Studio you will see a “Properties” panel titled “Report:SimpleReport”. If you do not see this panel, right click on the SimpleReport node and select Show Properties.
On the properties panel,expand the Misc node, and you will see another node called “Main Dataset”. Expand the “Main Dataset” node. You will see a blank property called “Default Data Adapter”.
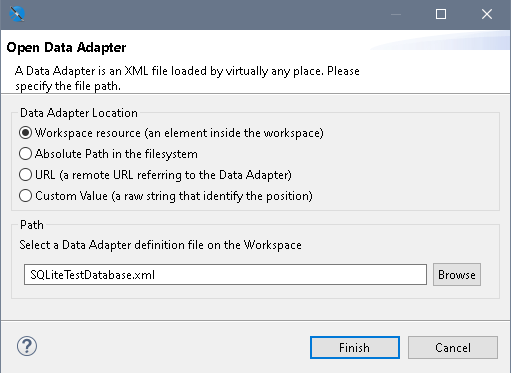
When you click on “Default Data Adapter” you will see a “…” appear. When you click on the “…” a panel will appear which has some options to configure. Select (the default) “Workspace Resource (use a resource in the workspace)”. Then use the Browse button to select the SQLiteTestDatabase.xml file. The panel should look like the image below before you press the Finish button.
After pressing the Finish button, the property for Default Data Adapter for the SimpleReport will be filled in with “SQLiteTestDatabase.xml”.
Starting the Simple Report Definition
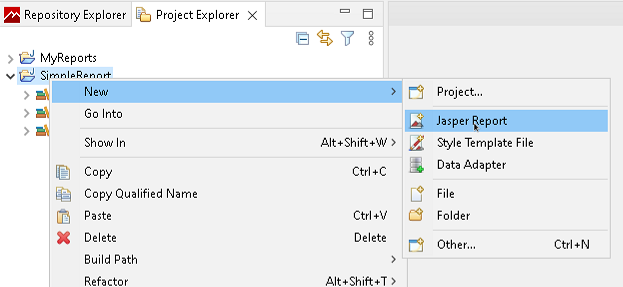
This Simple Report will have one table in it to show all the data in the SimpleSQLiteTest.sqlite database. To start this report, right click on the SimpleReport node in the Project Explorer, then select New, and then select “Jasper Report”.
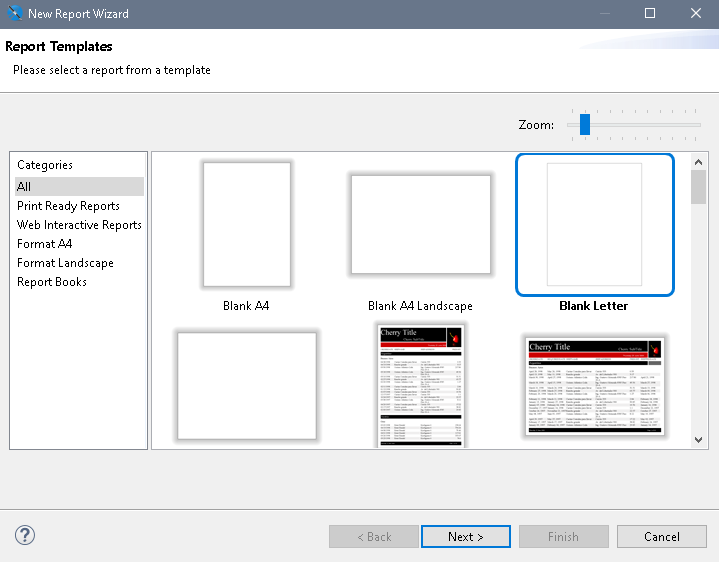
A configuration wizard will be shown to select the layout for the report. For this simple report select the plain “Blank Letter” layout.
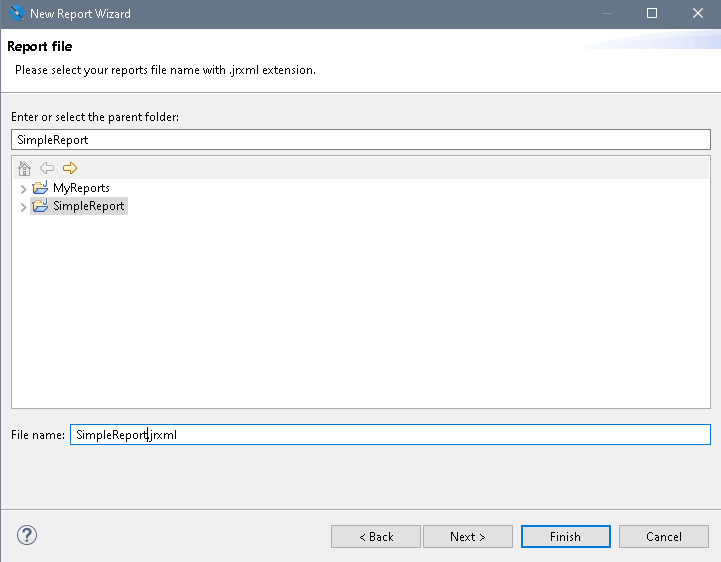
When you press Next a new panel will appear to set the name of the report definition (.jrxml) file. Make sure the parent folder says “SimpleReport”, and change the default name at the bottom from “Blank_Letter.jrxml” to “SimpleReport.jrxml”. Press Finish.
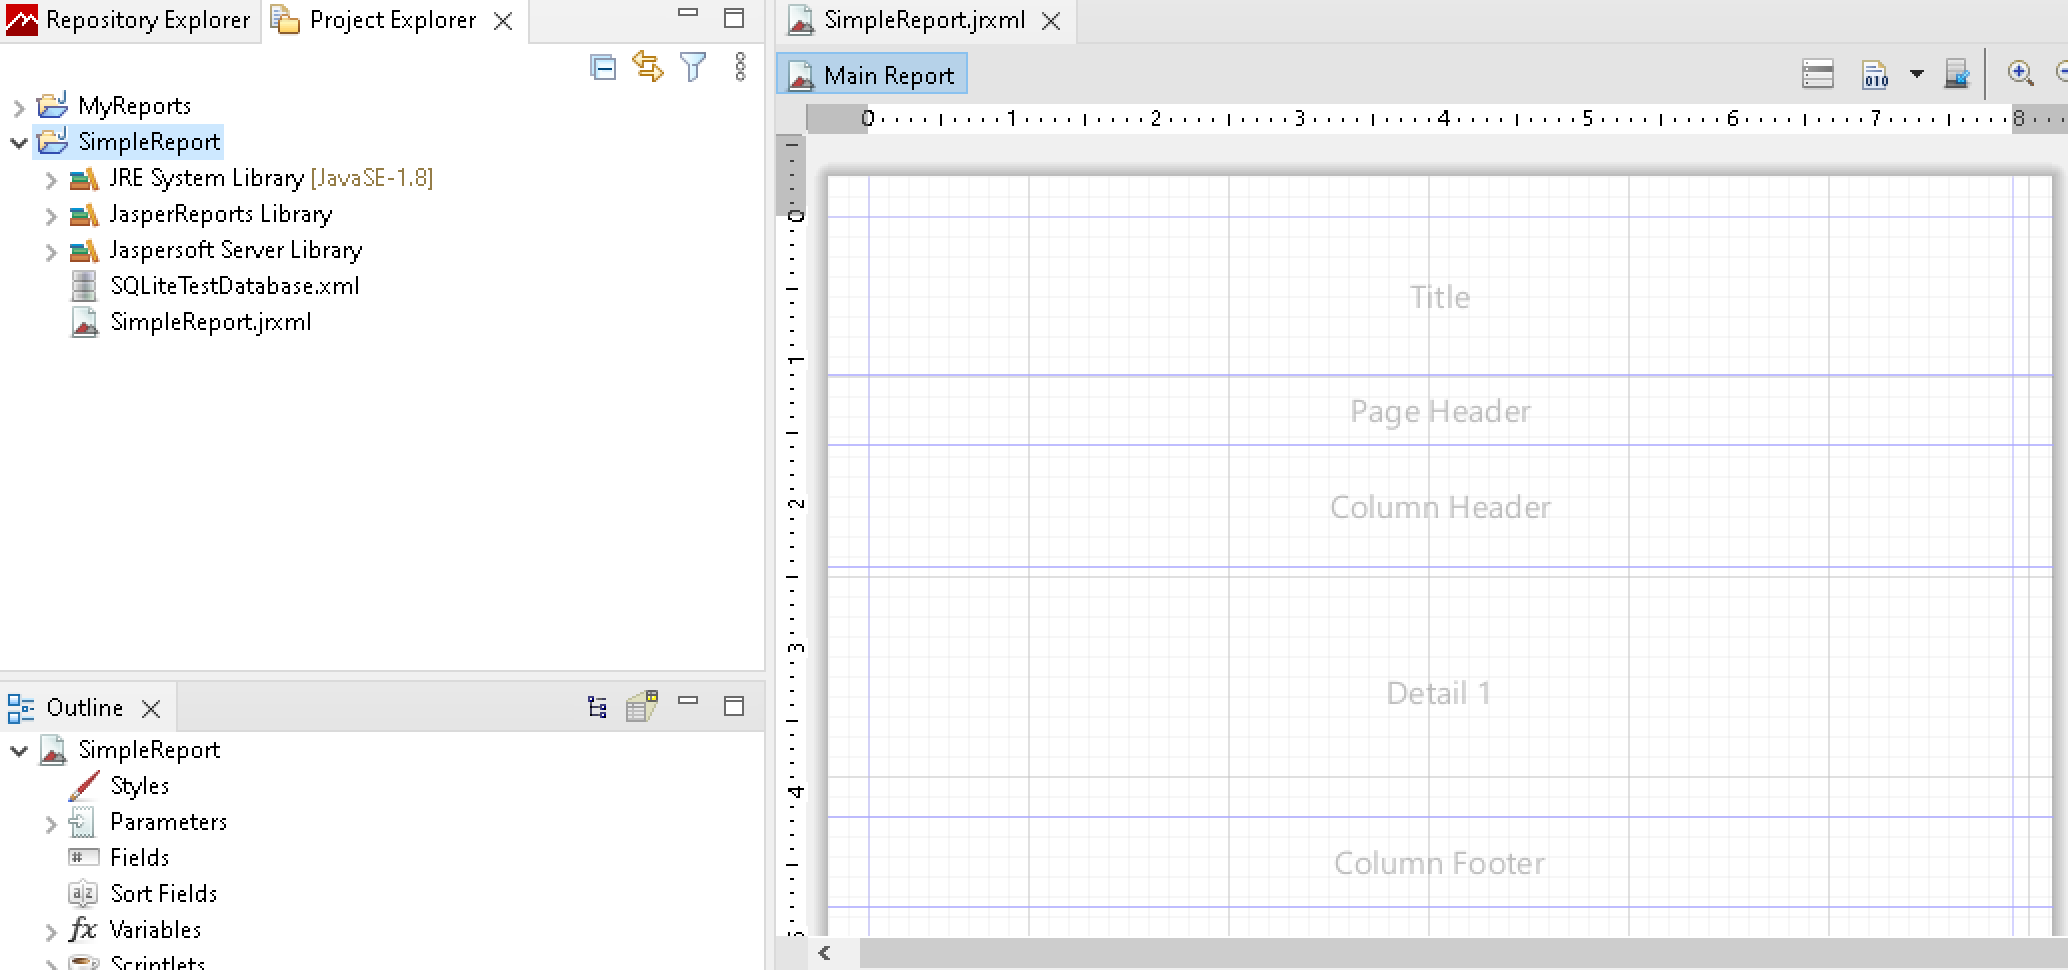
Jaspersoft Studio will generate the SimpleReport.jrxl and start the design workspace. If you expand the “SimpleReport” node in the Project Explorer you will see the project definition “SimpleReport.jrxml” there. You will also see the base layout for the report in the Main Report area in the center design area.
Global Report Query
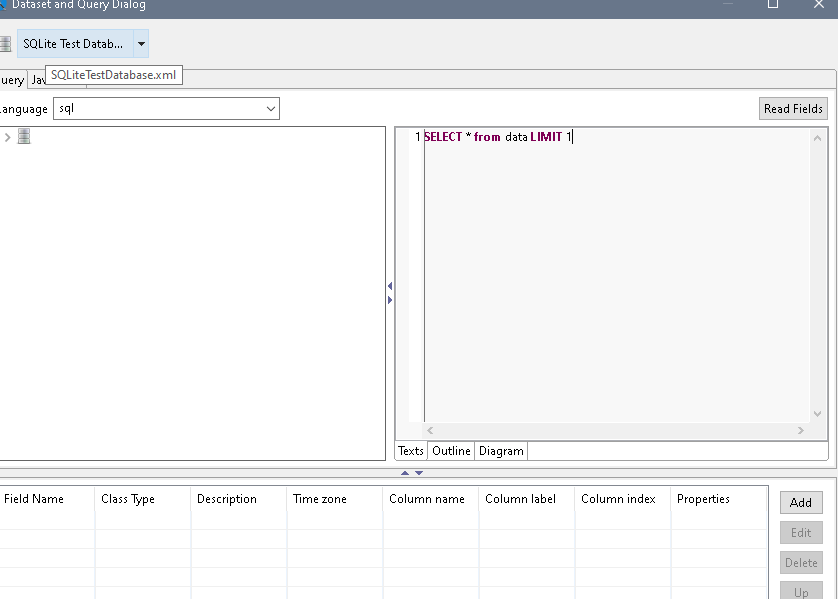
The Jasper Report “SimpleReport” will need a default SQL query which is executed when the report starts up. For this example project we do not need much information for the report, just a test statement. We will use the simple “SELECT * from data LIMIT 1” to just get a test result from the data table.
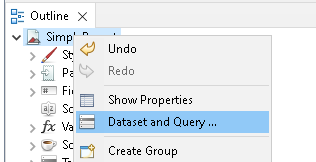
Right click on the main report node “SimpleReport” in the Outline design view and select “Dataset and Query…”.
The Dataset and Query panel will popup. Be sure that the exported connection “SQLiteTestDatabase.xml” is selected for the Data Adapter at the top. Enter “SELECT * from data LIMIT 1” into the query field to the right as shown in the image below.
Press OK to finish this setup and close the Dataset and Query Dialog panel.
Adding a Table to the Simple Report
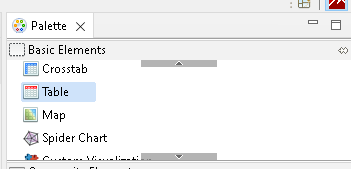
This simple report will have one component in it, a table, to show the data in the SimpleSQLiteTest.sqlite database. Ignore the separate “bands” shown in the report design as faint lines with labels such as “Title”, “Page Header”, “Summary”, etc. To add a table, find the “Palette” panel in the upper right hand side of the JasperStudio application frame. Scroll through the Basic Elements until you find a “Table”.
Select and drag this “Table” to the top left area of the report layout (will be in the band called “Title”, but this does not matter). As soon as you release the mouse you will see a “Table Wizard” configuration panel pop up asking about the data source for the table. You will need to use “Create a Table using a new dataset”. A “dataset” is simply data provided by a Data Adapter. For this report we want the data from the SimpleSQLiteTest.sqlite database. The Data Adapter definition has been exported in the “SQLiteTestDatabase.xml” file so we will want to select this as the data source for the table.
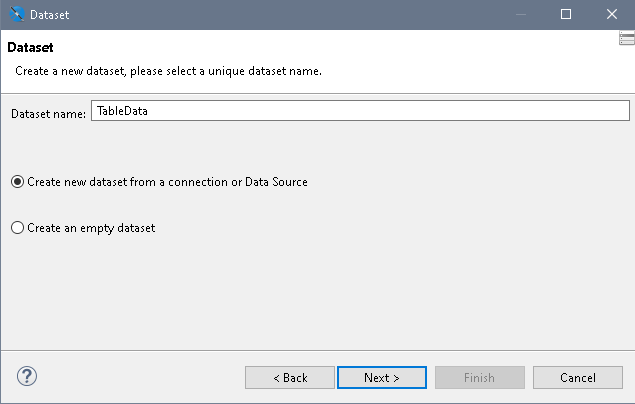
To set up the DataSet, press Next on the Table Wizard. The next panel asks you to name the DataSet for the Table. The default name is “DataSet1”, so change this to “TableData” for better clarity. Select “Create new dataset from a connection or Data Source” (the default). Press Next.
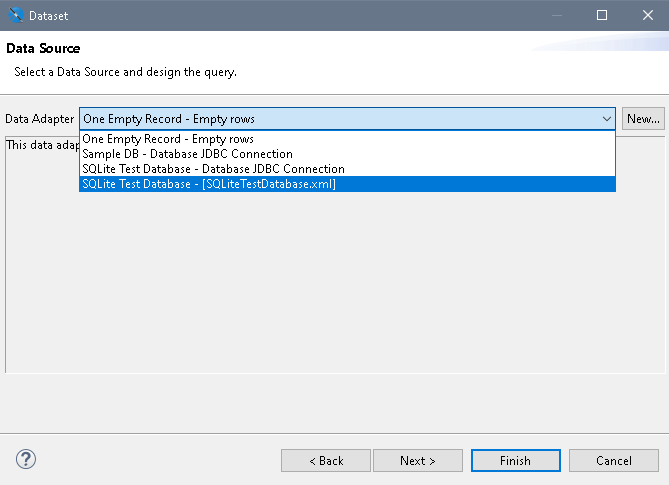
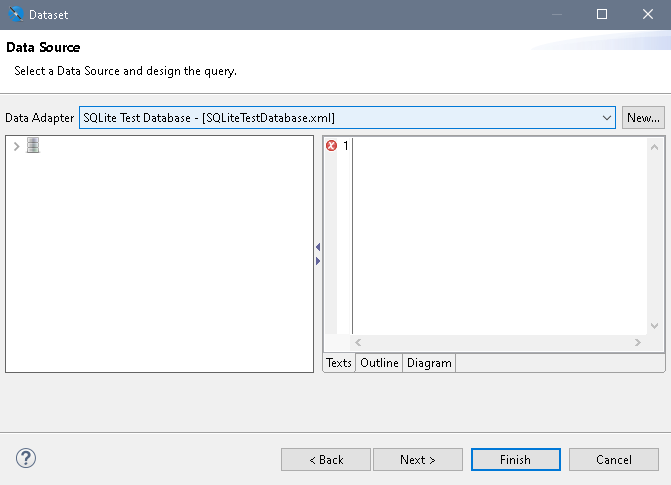
In the next panel we select the Data Source. Be sure to select the exported xml data source (SQLiteTestDatabase.xml) on the line that says “SQLite Test Database - [SQLiteTestDatabase.xml]”
As soon as you select the “SQLite Test Database - [SQLiteTestDatabase.xml]” option the last configuration panel is shown. The next steps use the database to get the names of the columns for the table.
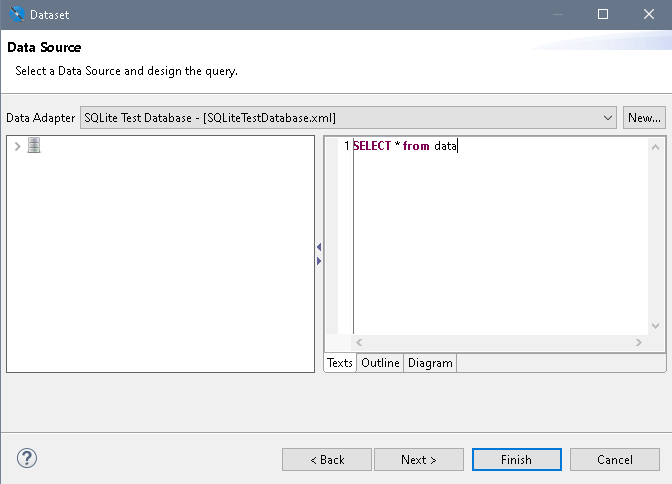
In this last panel you will see a field on the right side which has red circle and cross next to it. This is the area you type the SQL statement to get the data from the database. For this example use the simple query “SELECT * from data” (data is the name of the table in the SimpleSQLiteTest.sqlite which has data we want to display).
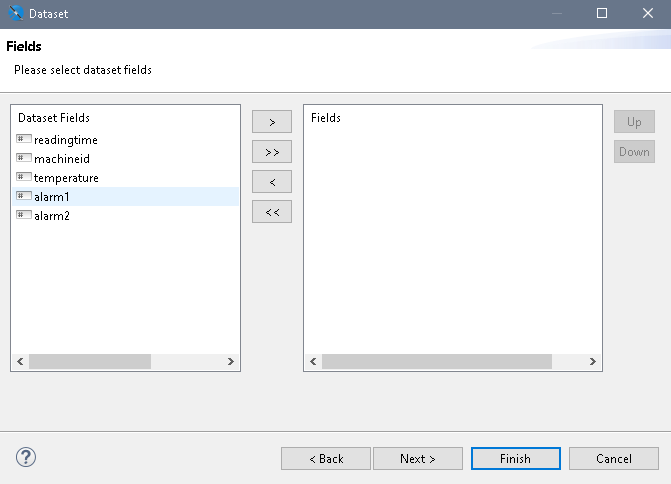
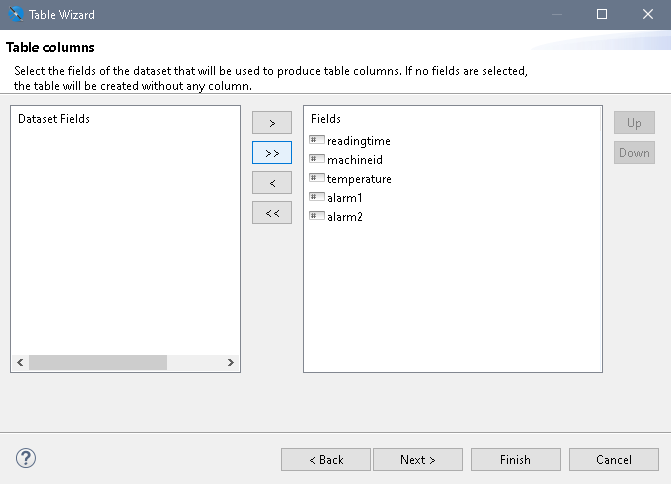
When you press Next on this panel after entering the SQL statement, the query will be executed and Jaspersoft Studio will show you the columns it found in the table.
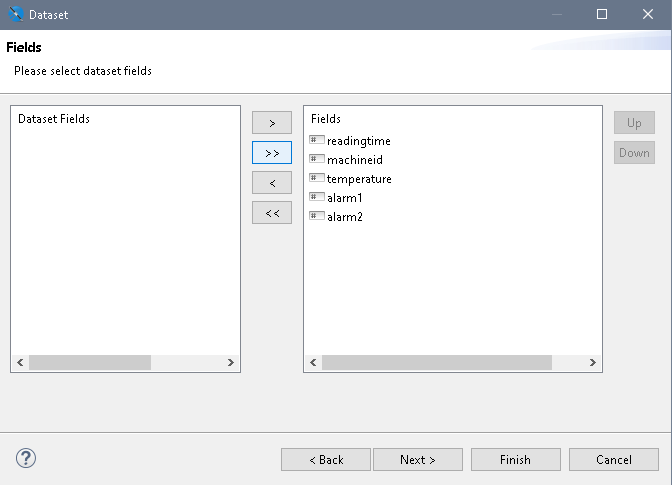
Select all the columns by pressing the » button and then press the Next button on the bottom of the panel.
The next panel defines grouping of data in the report and is an advanced feature we can ignore for now. So just press the Next button at the bottom of the panel.
The next panel asks which database connection to use for the table. Generally we always want to use the same connection defined for the Report, so select the option to “Use the same JDBC connection used to fill the master report”. Press Next on the bottom of the panel.
The next panel lets you select which columns you want to use for the table. Sometimes a database table will have more columns and data than you need for your report. In this step you will define a SQL statement which only gets the data you need for this table. In this simple report example we will get all the data in the database. In more advanced tutorials we will show you how to get a subset of data for the table and pass parameters into the report to customize SQL queries.
For this report we want all the columns so use the » button to select every column. Press the Next button.
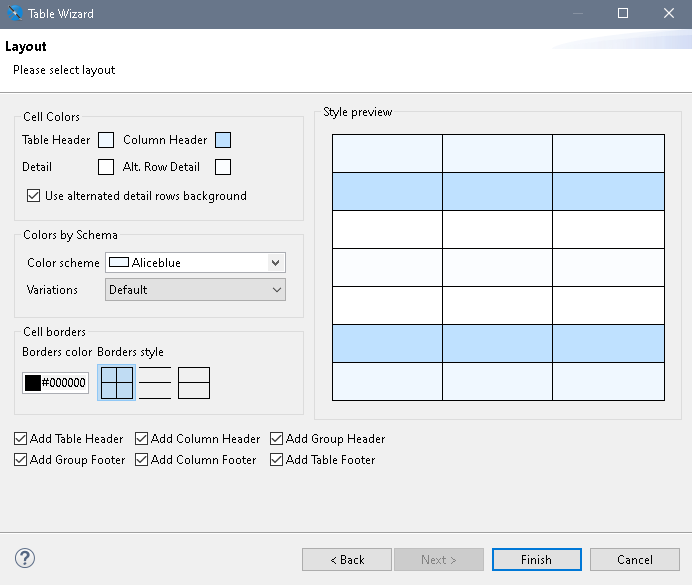
The next panel is the final panel of the configuration. This panel configures the details of how the table will be displayed. The only suggested option to change for this Simple Report is to select “Use alternated detail rows background” so that the background color of the rows changes from light blue to white from row to row. After this selection, press Finish.
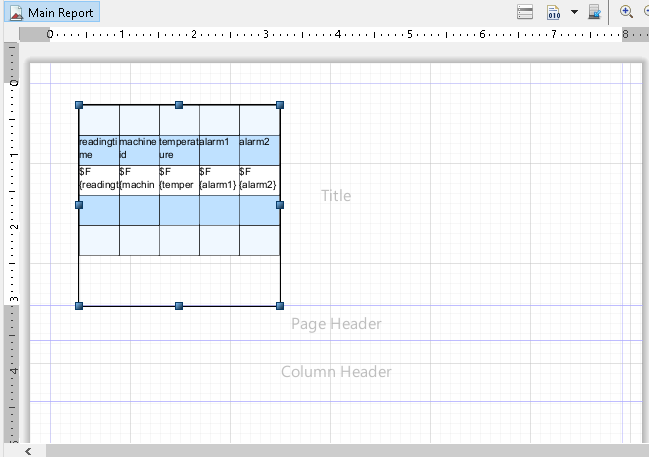
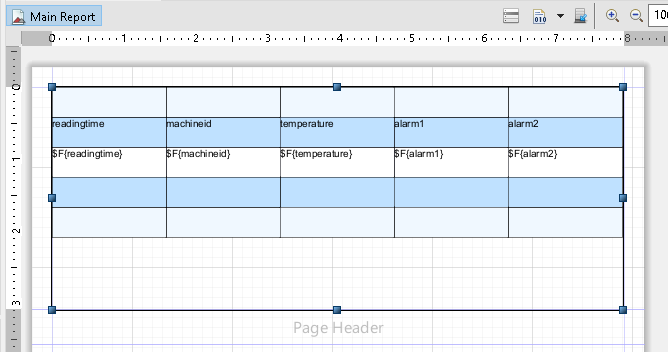
Now you will see the basic table in the report design area, complete with the column headings selected in the configuration. In the next steps we will expand the table to fill the report page and test the report.
Final Steps for the Simple Report
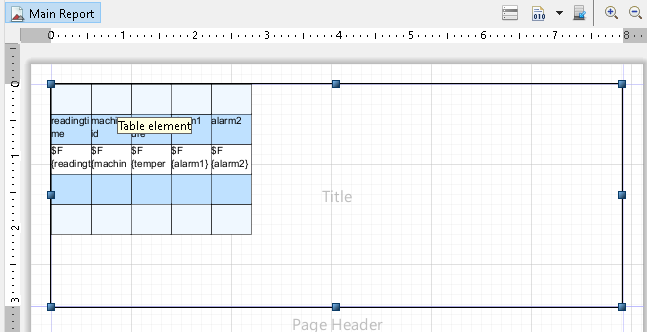
The last steps to complete the Simple Report is to stretch the table to fit the page and to test the database connection. To make the table fit the page, select the table and drag the table's upper left corner to the inside of the band (Title) outline, and stretch the right side of the table to the far right of the band outline. After this the table will fit the page (useful for PDF reports).
The columns do not yet fill the size of the table. To do this, select the Table tab on the properties panel and select “Fit columns to the table element”.
After this selection the table columns will be evenly spaced and fill the table you just resized in the previous step.
Testing the DataSet "TableData"
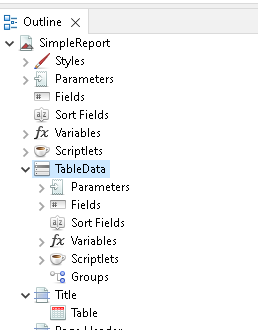
The SimpleReport project outline now includes a “TableData” node which is a JaperReports Dataset, meaning it contains all the information needed to retrieve data from the SimpleSQLiteTest.sqlite database for the table.
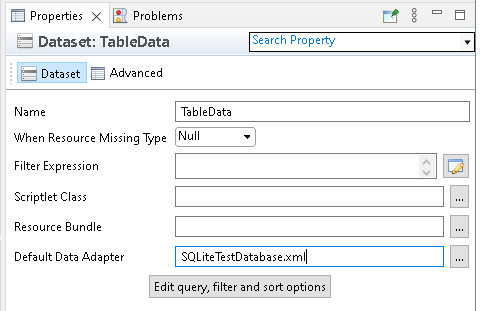
The Dataset “TableData” can be tested in Jaspersoft Studio to make sure the SQL query works and that the data read from the database is as expected. To test the Dataset, select the “TableData” node in the project Outline and then go to the Properties panel for this element.
Notice that there is a property “Default Data Adapter” which is probably empty. Use the “…” button to browse for the workspace resource “SQLiteTestDatabase.xml”. This is essential to make sure that the Table will be filled with data at runtime.
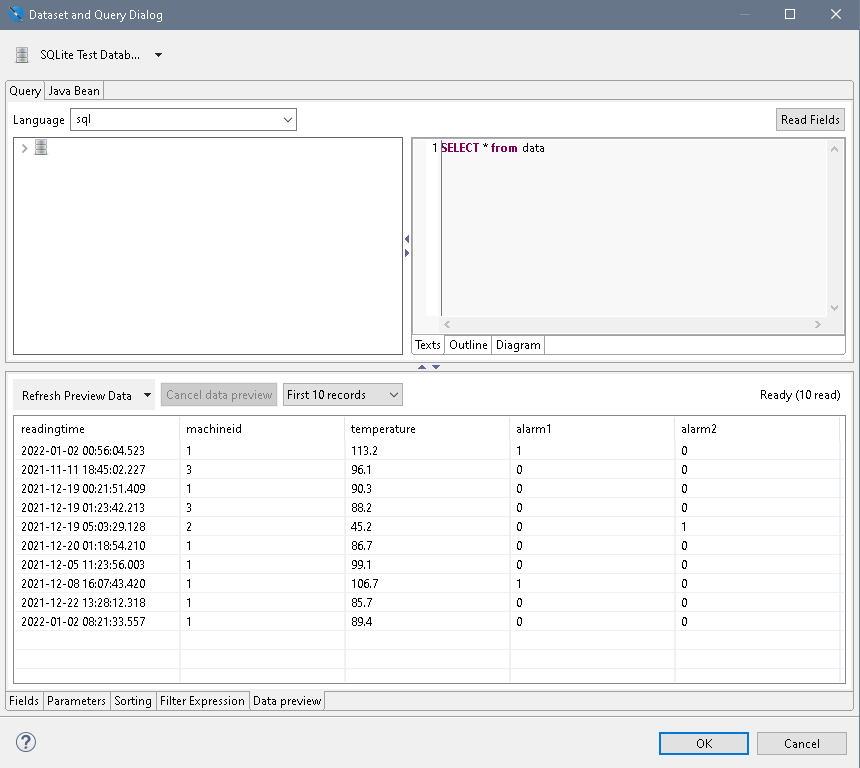
Click on the “Edit query, sort, and filter options” button to popup a panel which can be used to test the database query and connection to the database. The query “SELECT * from data” will select all the rows and columns in the table “data”. To test this, click on the tab at the bottom labeled “Data preview”, and then the tab called “Refresh Preview Data” to trigger the lookup. This will show you 10 values from the database lookup (since “First 10 Records” is selected). This demonstrates that the query is functional and that the database connection is working.
Test the Table
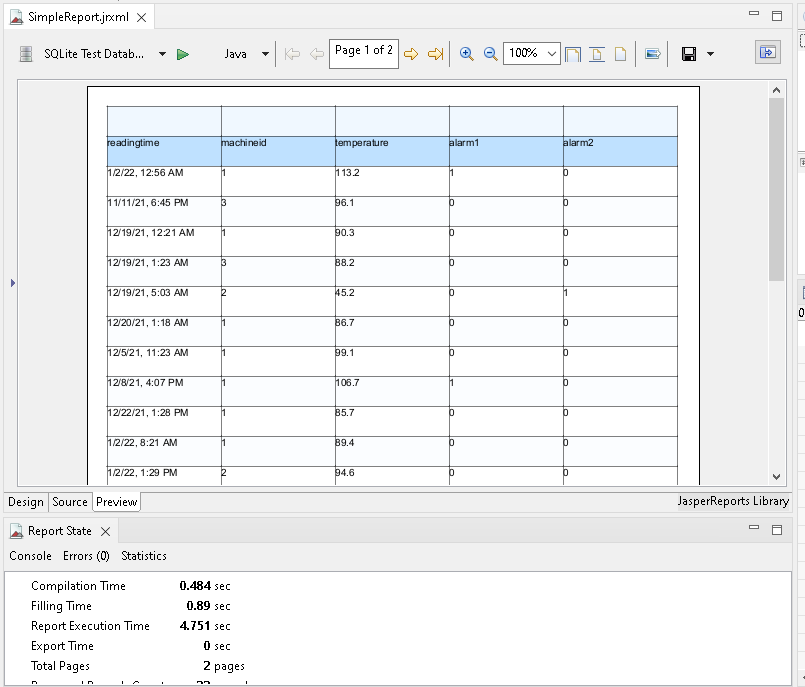
To test that the table in the report can display the data from the database, select the Table in the Outline view of Jaspersoft Studio. On the bottom of the Report Design frame are tabs that say “Design”, “Source”, and “Preview”. “Design” is the view we have been using to this point. “Source” shows you the report's xml code design (the .jrxml file which contains everything which has been configured for the report). Clicking on the “Preview” tab builds (compiles) the report and runs the SQL query(s) set up for the report. When you select “Preview” you will see the report and the table will be filled with the data from the database. If you get an empty table, check that all the queries and default data adapter settings are valid in the steps above.
Compile the Report
The Simple Report needs to be compiled into a “.jasper” file to be used by MIStudio or TransSECS, or by MIX or deployed TransSECS applications at runtime. To compile the report use the Jaspersoft Studio top menu Project tab and select “Build Project” or you can use the the Project Explorer, select “SimpleReport”, right-click and select the “Build Project” option. After selecting “Build Project” you will have a SimpleReport.jasper file in your workspace project directory (same directory where the SimpleReport.jrxml and SQLiteTestDatabase.xml files reside).
This Simple Report design, test, and compile example is complete.
The next tutorial covers how to run the generated SimpleReport.jasper report using MIStudio.
It is recommended that you add your jasper report definitions to the same code repository you use for other projects so that you can recover the file and track changes as needed. The two files you should save for this project are the SimpleReport.jrxml and SQLiteTestDatabase.xml, and optionally the SQLite database.
Tutorial 2: Running the SimpleReport in MIStudio
This is an extension of the Tutorial 1: Simple Report Design and Test Example. If you want to skip Tutorial 1, you can get the set of files needed to run Tutorial 2 here.
The purpose of this Tutorial is to show you how to use the compiled SimpleReport JasperReport project built with Jaspersoft Studio in Tutorial 1 to generate a PDF report in MIStudio.
Setting Up
If you do not have MIStudio Plus Reporting installed please do this step first.
You will need these files from the SimpleReport project in Tutorial 1: the compiled report SimpleReport.jasper, the database SimpleSQLiteTest.sqlite, the SQLite driver jar (i.e., sqlite-jdbc-3.30.1.jar or similar), and the exported data adapter definition SQLiteTestDatabase.xml. Put all of these files into the MIStudioSuite/MIStudio directory of your installation (so in the root of the MIStudio folder).
You will need to edit the SQLiteTestDatabase.xml file in a text editor (Notepad++ or similar) to remove the hard-coded paths to the database file and the driver jar. It should look similar to this, with the correct name for your SQLite driver jar:
<?xml version="1.0" encoding="UTF-8" ?>
<jdbcDataAdapter class="net.sf.jasperreports.data.jdbc.JdbcDataAdapterImpl"><name>SQLite Test Database</name><driver>org.sqlite.JDBC</driver><username></username><password></password><savePassword>true</savePassword><url>jdbc:sqlite:SimpleSQLiteTest.sqlite</url><database></database><serverAddress></serverAddress><classpath>sqlite-jdbc-3.30.1.jar</classpath></jdbcDataAdapter>
You will also need the DynamicJasper.jar in your MIStudio lib directory, which is installed with the Jasper Reports module for MIStudio.
MIStudio SimpleReport Project
Start MIStudio and create a new project, SimpleReport. Add a button to the design window and copy this to the diagram window. Label this button “Generate PDF”. In the Diagram Window, add a JavaScript Bean. Connect the Button to the trigger of the JavaScript.
Copy and paste this script to the JavaScript bean:
//Script to generate a PDF report from SimpleReport.jasper

var HashMap = Java.type("java.util.HashMap");
var FileInputStream = Java.type("java.io.FileInputStream");
var JasperPrint = Java.type("net.sf.jasperreports.engine.JasperPrint");
var JasperFillManager = Java.type("net.sf.jasperreports.engine.JasperFillManager");
var JasperExportManager = Java.type("net.sf.jasperreports.engine.JasperExportManager");

compiledReport="SimpleReport.jasper";
outputName = "SimpleReport.pdf";

try {
        reportStream = new FileInputStream(compiledReport);
        parameters = new HashMap(); //empty hashmap  (no parameters)
        jasperPrint = JasperFillManager.fillReport( reportStream , parameters);
        JasperExportManager.exportReportToPdfFile(jasperPrint,outputName);


} catch (e) {
    print("Error in Run JasperReport script: \n"+e.stack);
    print(e);

}
Go to the Test Frame of MIStudio and press the “Generate PDF” button. You will see a pdf called “SimpleReport.pdf” generated in the same directory as the SimpleReport.jasper file (the root MIStudio directory).
That's the end of this basic Tutorial. You can also generate other report types from this same SimpleReport.jasper file (see code examples below).
Generate a Spreadsheet from SimpleReport
Instead of generating a PDF you can make an xls or xlsx report (excel spreadsheets), or a csv file.
To make an xls spreadsheet, use this code in the JavaScript bean:
//Script to run SimpleReport.jasper as an XLS Excel Spreadsheet

var HashMap = Java.type("java.util.HashMap");
var FileInputStream = Java.type("java.io.FileInputStream");
var JasperPrint = Java.type("net.sf.jasperreports.engine.JasperPrint");
var JasperFillManager = Java.type("net.sf.jasperreports.engine.JasperFillManager");
var JRXlsExporter = Java.type("net.sf.jasperreports.engine.export.JRXlsExporter");
var SimpleOutputStreamExporterOutput = Java.type("net.sf.jasperreports.export.SimpleOutputStreamExporterOutput");
var SimpleExporterInput = Java.type("net.sf.jasperreports.export.SimpleExporterInput");

compiledReport="SimpleReport.jasper";
outputName = "SimpleReport.xls";

try {
        reportStream = new FileInputStream(compiledReport);
        parameters = new HashMap(); //empty hashmap  (no parameters)
        jasperPrint = JasperFillManager.fillReport( reportStream , parameters);
        xlsExporter = new JRXlsExporter();
        xlsExporter.setExporterInput(new SimpleExporterInput(jasperPrint));
        xlsExporter.setExporterOutput(new SimpleOutputStreamExporterOutput(outputName));
        xlsExporter.exportReport();


} catch (e) {
    print("Error in Run JasperReport script: \n"+e.stack);
    print(e);

}
to make an xlsx spreadsheet, use this code in the JavaScript bean:
//Script to run SimpleReport.jasper as an XLSX Excel Spreadsheet

var HashMap = Java.type("java.util.HashMap");
var FileInputStream = Java.type("java.io.FileInputStream");
var JasperPrint = Java.type("net.sf.jasperreports.engine.JasperPrint");
var JasperFillManager = Java.type("net.sf.jasperreports.engine.JasperFillManager");
var JRXlsxExporter = Java.type("net.sf.jasperreports.engine.export.ooxml.JRXlsxExporter");
var SimpleOutputStreamExporterOutput = Java.type("net.sf.jasperreports.export.SimpleOutputStreamExporterOutput");
var SimpleExporterInput = Java.type("net.sf.jasperreports.export.SimpleExporterInput");

compiledReport="SimpleReport.jasper";
outputName = "SimpleReport.xlsx";

try {
        reportStream = new FileInputStream(compiledReport);
        parameters = new HashMap(); //empty hashmap  (no parameters)
        jasperPrint = JasperFillManager.fillReport( reportStream , parameters);
        xlxsExporter = new JRXlsxExporter();
        xlxsExporter.setExporterInput(new SimpleExporterInput(jasperPrint));
        xlxsExporter.setExporterOutput(new SimpleOutputStreamExporterOutput(outputName));
        xlxsExporter.exportReport();


} catch (e) {
    print("Error in Run JasperReport script: \n"+e.stack);
    print(e);

}
to make a csv file, use this script:
//Script to run SimpleReport.jasper to generate a CSV file

var HashMap = Java.type("java.util.HashMap");
var FileInputStream = Java.type("java.io.FileInputStream");
var JasperPrint = Java.type("net.sf.jasperreports.engine.JasperPrint");
var JasperFillManager = Java.type("net.sf.jasperreports.engine.JasperFillManager");
var JRCsvExporter = Java.type("net.sf.jasperreports.engine.export.JRCsvExporter");
var SimpleCsvExporterConfiguration = Java.type("net.sf.jasperreports.export.SimpleCsvExporterConfiguration");
var SimpleWriterExporterOutput = Java.type("net.sf.jasperreports.export.SimpleWriterExporterOutput");
var SimpleExporterInput = Java.type("net.sf.jasperreports.export.SimpleExporterInput");

compiledReport="SimpleReport.jasper";
outputName = "SimpleReport.csv";

try {
        reportStream = new FileInputStream(compiledReport);
        parameters = new HashMap(); //empty hashmap  (no parameters)
        parameters.put("IS_IGNORE_PAGINATION", true);
        jasperPrint = JasperFillManager.fillReport( reportStream , parameters);
        csvExporter = new JRCsvExporter();
        csvExporter.setExporterInput(new SimpleExporterInput(jasperPrint));
        csvExporter.setExporterOutput(new SimpleWriterExporterOutput(outputName));
        csvConfiguration = new SimpleCsvExporterConfiguration();
        csvConfiguration.setWriteBOM(true);
        csvConfiguration.setRecordDelimiter("\r\n");
        csvExporter.setConfiguration(csvConfiguration);
        csvExporter.exportReport();

} catch (e) {
    print("Error in Run JasperReport script: \n"+e.stack);
    print(e);

}
Run the SimpleReport from TransSECS
You can trigger a script in TransSECS Devices with a CEID (Collection Event) or any other trigger to run the same reports as you can run in MIStudio and MIX. Copy the files listed in the setup section to your TransSECS project's resources directory. These files will be copied to the deployment when you build your TransSECS project.
